A comprehensive tutorial on how to implement user subscriptions in a Next.js app using Reflow auth.

Integrating user subscriptions in a Next.js application can be a daunting task. However, with Reflow Auth, you can streamline the process and get your subscription model up and running swiftly.
This guide will walk you through the steps needed to set up Reflow Auth in your Next.js app to handle user authentication and manage subscriptions efficiently.
What We Will Be Building
To showcase the library in action, we will be building a one-page Next.js 14 app demo with the following features:
- User accounts with email and password or by connecting a Google profile.
- Fully featured sign-in and sign-out functionality with user state and sessions.
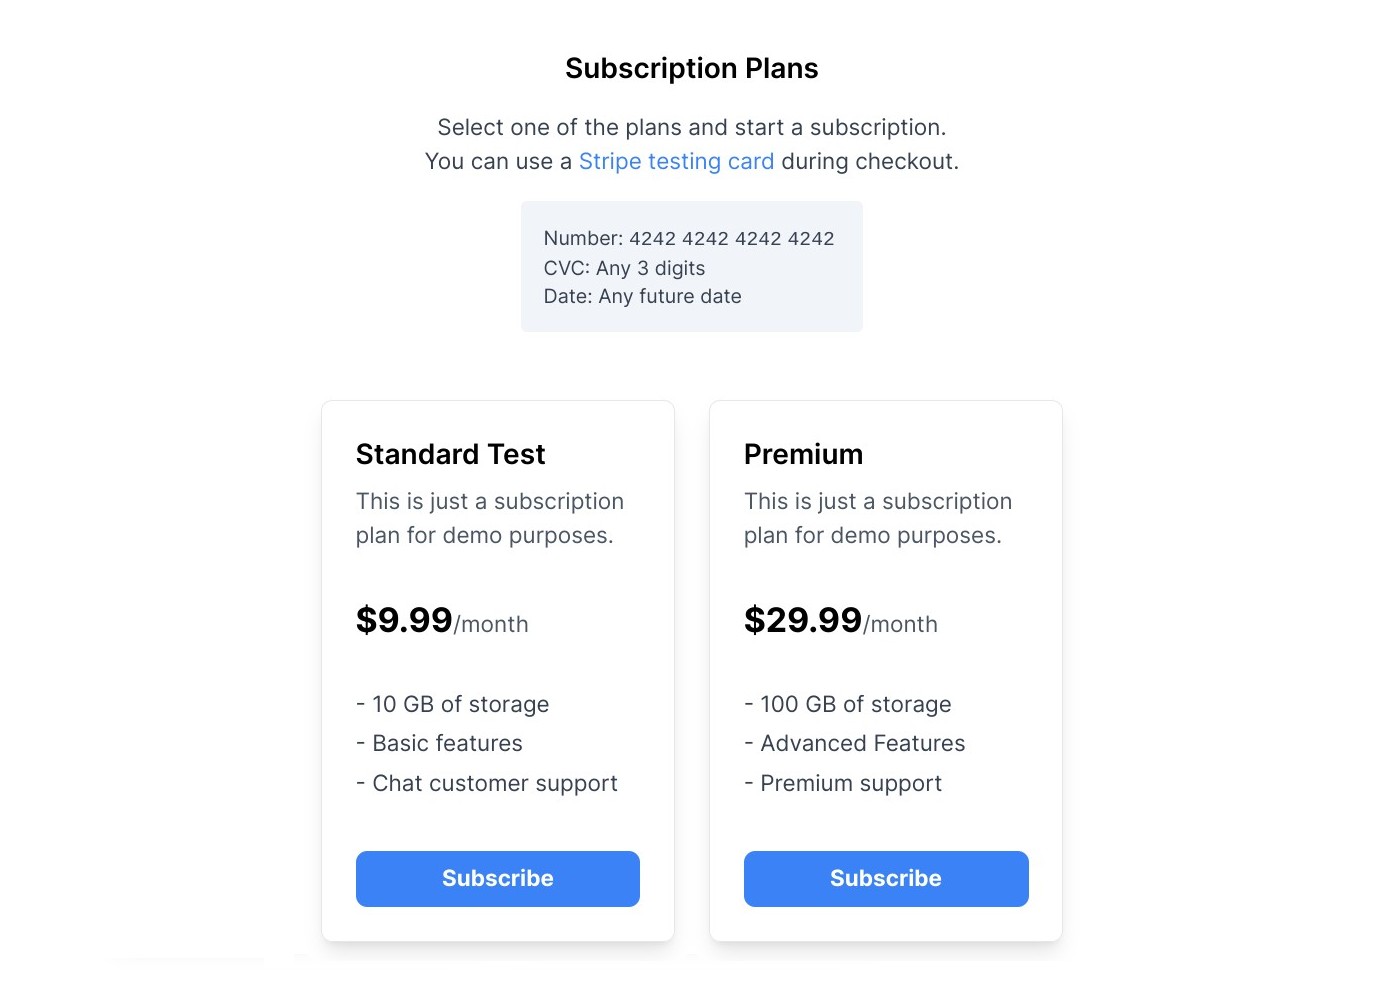
- Pricing table offering two plans - Standard and Premium.
- Stripe checkout integration for setting up the initial payment and automatic recurring payments after that.
- Guarded actions that can only be accessed depending on the current user's auth and subscription status.
The full code for this article is available on GitHub. You can also check out the live demo hosted on Vercel.
Setting Up The Project
The easiest way to setup a Next.js project is with the help of the create-next-app package.
Navigate to a directory where you want to create your project and run npx create-next-app from the terminal to generate a clean Next.js template.
This command will display a helpful UI for selecting what features we want included. To make following this tutorial easier, we recommend going with the same options we've selected, which are all pretty standard.
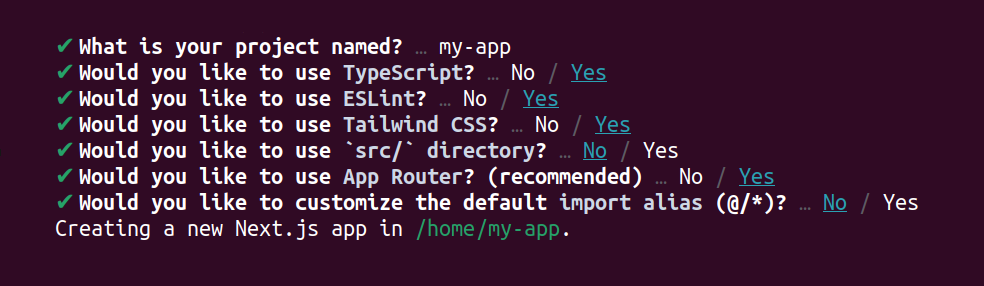
The most important settings here are TypeScript and Tailwind CSS, as well as going with the App Router structure, although the Pages Router will also work with slight modifications.
After the script finishes setting up all the files, we can cd to the newly created directory and run npm run dev to start the Next.js dev server.
If everything works correctly, you will be able to see the default template on http://localhost:3000/. This page has some boilerplate content which we won't need, so let's open /app/page.tsx and clear everything.
export default function Home() {
  return <p>Hello World!</p>;
}
This will give us an empty page we can work with. It will be the only page we'll need for this tutorial.
Installing Reflow Auth
We will be using the Reflow auth-next for handling user authentication as well as creating and managing subscriptions.
Like all auth libraries for Next.js, it requires a bit of a setup but thankfully Reflow auth-next installation is very quick and standardized.
Install the NPM Package
First we need to install the library using npm or another package manager such as yarn or pnpm.
npm install @reflowhq/auth-next
Initialize ReflowAuth Server-side
Then, we need to create a file called auth.ts in the root directory of our project. It will setup the server-side of the library.
import "server-only";
import { ReflowAuth } from "@reflowhq/auth-next";

export default function getAuth(): ReflowAuth {
  const { SESSION_SECRET, REFLOW_PROJECT_ID, REFLOW_TEST_MODE } = process.env;

  return new ReflowAuth({
    projectID: Number(REFLOW_PROJECT_ID),
    secret: String(SESSION_SECRET),
    testMode: REFLOW_TEST_MODE == "true",
  });
}
The ReflowAuth constructor has a couple of required options. You can set these inline directly in the auth.ts file but for easier deployment and environment setup, we recommend reading them from an .env file.
Environment Variables
In Next.js, environment variables can be configured by creating an .env.local file in the root directory of the project.
REFLOW_PROJECT_ID=
SESSION_SECRET=
REFLOW_TEST_MODE=true
For REFLOW_PROJECT_ID you will need the ID of your Reflow project. You can get it from the settings page in the Reflow dashboard.
The SESSION_SECRET can be any 32 character-long string. It is necessary for encrypting user cookies, making sure that only your code can read their contents. You can run openssl rand -hex 16 in the terminal to quickly generate a secret key.
Lastly, set REFLOW_TEST_MODE to true if you want to use the app in test mode. This will allow you to test subscription payments without using real money.
You should never commit your
.env.localfiles to git or make them public in other ways. Doing so can expose your secret codes and other sensitive data.
Add the Route Handler
The route handler file will act as the "glue" between the Reflow client functions and the server. Create a new file with the exact path app/auth/route.ts and set its content to the code below.
import getAuth from "../../auth";

export async function POST(request: Request) {
  const auth = getAuth();
  return await auth.handleRequest(request);
}
The auth-next library is now ready to go! You can visit the Reflow auth-next docs for more information about the setup and available settings.
Configuring Reflow
Before we add more code, let's head over to the Reflow website and configure our authentication and subscription settings.
Sign In Providers
Reflow supports a number of sign-in providers, including fully-featured email+password accounts, as well as login with social accounts like Google, Facebook and Apple to name a few.
You can enable all the providers you wish to offer from the sign in settings. The Reflow docs cover the steps for connecting the different providers in detail.
For this tutorial we've enabled the email+password and Google providers. When users attempt to sign-in they will be presented with the following dialog:
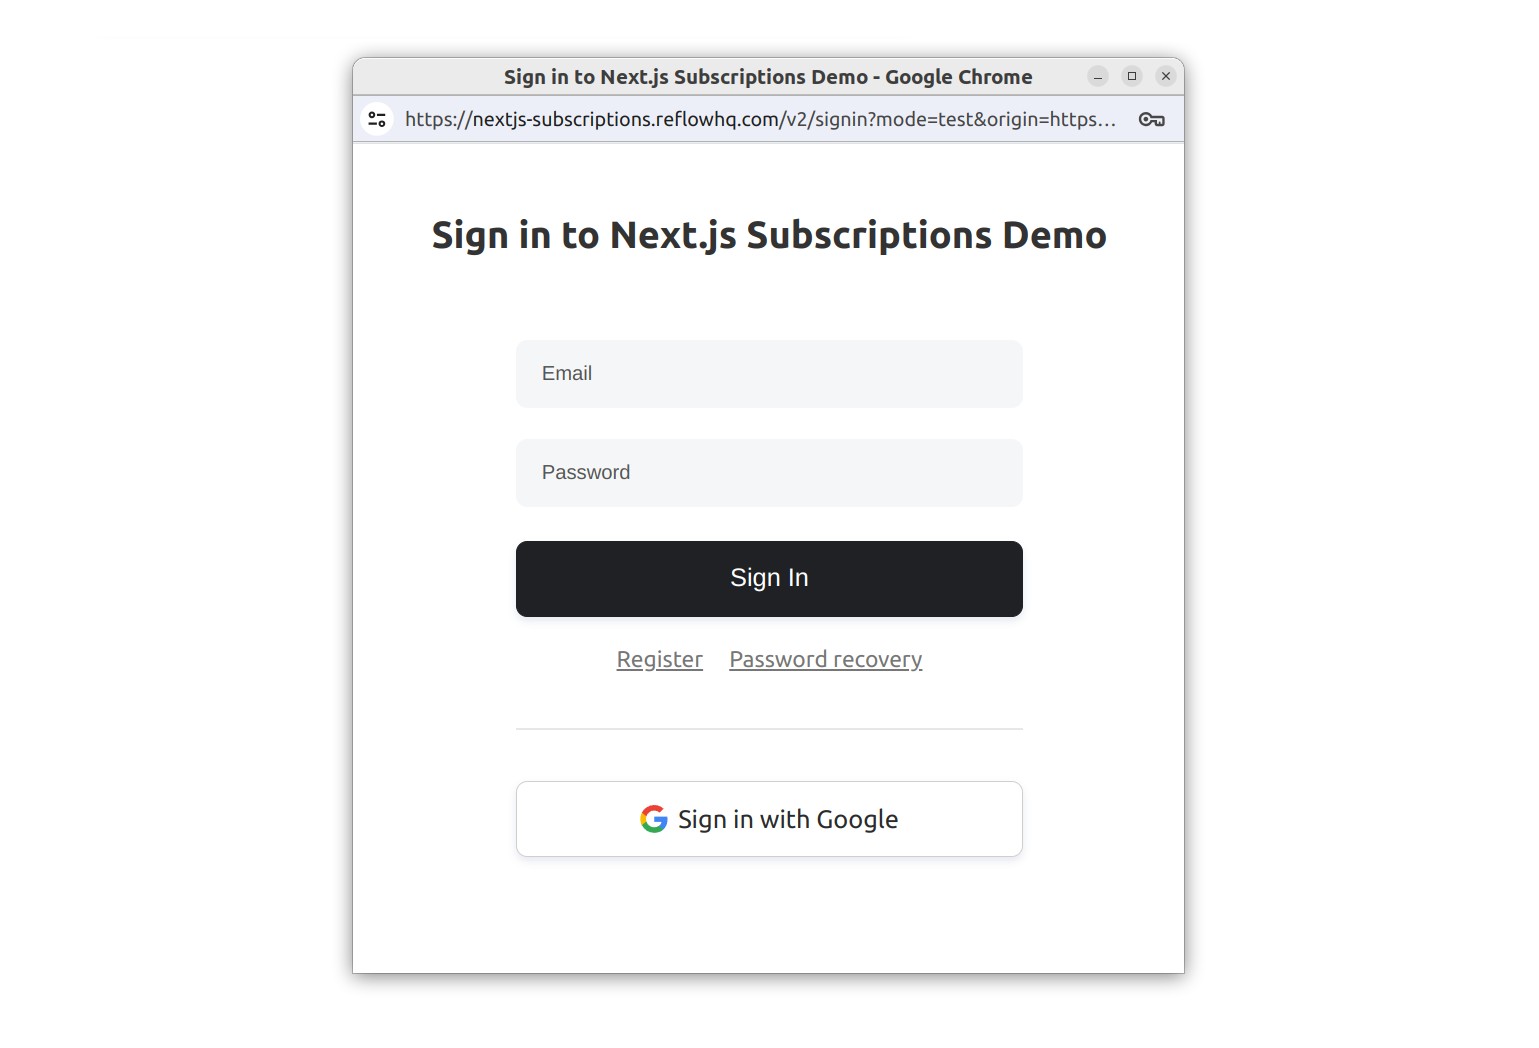
Depending on your desired settings this dialog can also show buttons for logging in with Apple, GitHub or any of the other supported providers.
Subscription Plans
The subscription plan offerings for each app will differ widely depending on the pricing strategy and the product itself. For some apps you might want a single plan that unlocks everything. For other a good-better-best strategy might be more suitable.
Luckily, Reflow gives you complete freedom over the plans and prices you wish to offer. You might even start with one strategy and switch to another in the future to try different revenue streams.
For this demo app we will go with two plans: Standard and Premium. For simplicity's sake each plan will offer only per-month payments, although per-year is also supported in Reflow.
To set this up, first we need to connect a payment provider to Reflow. For recurring payments Stripe and Paddle are supported.
After a payment method has been connected we can go to subscription plans and click Add Subscription Plan to configure the plan offerings and their prices.
Displaying a Pricing Table
Now that we have everything setup in Reflow, we can proceed with building the pricing table. For this we will need to fetch the subscription plans from the Reflow API and display them in a use client component.
The pricing table needs to be a client component because it will also be used for selecting a plan and starting a subscription. Since these actions will require user input, the component has to be rendered client-side (component interactivity).
Fetching the Plans Using The Reflow API
To fetch our subscription plans from the Reflow backend we can send a GET request to the /projects/<projectid>/plans/ endpoint (API docs).
We can do this by adding a server action in the page component:
export default async function Home() {
  async function getPlans() {
    "use server";

    const apiURL =
      process.env.REFLOW_TEST_MODE == "live"
        ? "https://api.reflowhq.com/v2"
        : "https://test-api.reflowhq.com/v2";

    const requestUrl = `${apiURL}/projects/${process.env.REFLOW_PROJECT_ID}/plans/`;

    const response = await fetch(requestUrl, {
      cache: "force-cache",
      next: { revalidate: 3000 },
    });

    return response.json();
  }
}
This function does a number of things:
- The "use server" directive marks this function as a server action. This guarantees fetches are done server-side, which is important for caching.
- Determines the API base url, depending on the test mode option we defined earlier in the env variables.
- Fills the Reflow project id in the url, also from the env variables file.
- Fetches the subscription plans synchronously and returns them in a JS object.
To get the subscription plans we just have to await getPlans and grab the .data property.
export default async function Home() {
  async function getPlans() {
    "use server";
    ...
  }

  const plans = (await getPlans()).data;
}
A Few Words About Caching
Since we are fetching the subscription plans from the Reflow API, it's best to cache them after the first fetch. This way, new visitors of the app will see the already cached plans, without the need of a new HTTPS fetch request to the Reflow API.
Next.js does this by default in versions 13 and 14, but there are plans for the the default value to change in Next.js 15.
Here comes a tiny problem though. Once our subscription plans have been cached, what happens if we need to make some changes? When the plans get updated in Reflow, we need to setup some way for our Next.js app to forget the cache and fetch them anew.
There are a couple of ways to solve this:
- Time-based Revalidation - This is the solution we've picked in this guide. The subscription plans will stay cached for 5 minutes, after which the next page request will re-fetch them. You can read more about time-based revalidation in the Next.js docs.
- Disable cache - For this, just change the cache option from
force-cachetono-store. This has the drawback of your app taking a tiny performance hit, because the plans will be re-fetched on every page load. - Manual cache purging - If you need to clear the cache immediately after making a change, a quick fix would be to manually purge the cache from the hosting provider (e.g. Purging Data Cache in Vercel).
Pricing Table Component
Now that we have fetched our subscription plans from the Reflow API, we can add a pricing table component that will iterate them and show them in a nice comprehensive view.
As discussed earlier, this will be a use-client component. We will also include a TypeScript interface for the plan object returned by the API.
"use client";

export default ({ plans }: { plans: Plan[] }) => {
  return (
    <div className="container mx-auto mt-8 max-w-xl px-6">
      <div className="flex flex-col justify-center gap-6 md:flex-row">
        {plans.map((plan) => (
          <div
            key={plan.id}
            className="flex flex-1 flex-col justify-between gap-y-8 rounded-lg border p-6 text-left shadow-lg"
          >
            <div>
              <h3 className="mb-2 text-xl font-semibold">{plan.name}</h3>
              <p className="text-gray-600">{plan.description}</p>
            </div>
            <div key={plan.prices[0].id} className="">
              <span className="text-2xl font-bold">
                {plan.prices[0].price_formatted}
              </span>
              <span className="text-gray-600">
                /{plan.prices[0].billing_period}
              </span>
            </div>
            <ul className="">
              {plan.features.map((feature: string, index: number) => (
                <li key={index} className="mb-1 text-gray-700">
                  - {feature}
                </li>
              ))}
            </ul>
          </div>
        ))}
      </div>
    </div>
  );
};

interface Plan {
  id: number;
  name: string;
  description: string;
  prices: {
    id: number;
    price: number;
    price_formatted: string;
    billing_period: string;
  }[];
  parameters: Record<string, any>;
  features: Record<string, any>;
  trial_days: number;
}
We can then add the pricing table to our page.
import PricingTable from "./components/PricingTable";

export default async function Home() {

  async function getPlans() { ... }

  const plans = (await getPlans()).data;

  return (
    <main className="flex min-h-screen flex-col items-center justify-start p-6 lg:p-24">
      <div className="relative flex w-full max-w-3xl flex-col items-center border bg-white px-4 py-16 text-left">
        <div className="flex flex-col gap-y-12">

          <section className="flex flex-col items-center gap-y-4">
            <h3 className="text-xl font-semibold">Subscription Plans</h3>
            <p className="max-w-lg text-center text-gray-700">
              Select one of the plans and start a subscription.
            </p>

            <PricingTable plans={plans} />
          </section>

        </div>
      </div>
    </main>
  );
}
Adding Subscribe Buttons
So far the pricing table only displays information about the plans. We also need to add buttons for each plan, that will allow users to select a plan and subscribe to it.
For this, we need to import createSubscription from @reflowhq/auth-next/client and attach it to an onClick event listener.
"use client";

import { useRouter } from "next/navigation";
import { createSubscription } from "@reflowhq/auth-next/client";

export default ({ plans }: { plans: Plan[] }) => {
  const router = useRouter();

  return (
    <div className="container mx-auto mt-8 max-w-xl px-6">
      <div className="flex flex-col justify-center gap-6 md:flex-row">
        {plans.map((plan) => (
          <div
            key={plan.id}
            className="flex flex-1 flex-col justify-between gap-y-8 rounded-lg border p-6 text-left shadow-lg"
          >
            <div>
              <h3 className="mb-2 text-xl font-semibold">{plan.name}</h3>
              <p className="text-gray-600">{plan.description}</p>
            </div>
            <div key={plan.prices[0].id} className="">
              <span className="text-2xl font-bold">
                {plan.prices[0].price_formatted}
              </span>
              <span className="text-gray-600">
                /{plan.prices[0].billing_period}
              </span>
            </div>
            <ul className="">
              {plan.features.map((feature: string, index: number) => (
                <li key={index} className="mb-1 text-gray-700">
                  - {feature}
                </li>
              ))}
            </ul>
            <button
              className="w-full rounded-lg bg-blue-500 py-2 font-bold text-white hover:bg-blue-600"
              onClick={() =>
                createSubscription({
                  priceID: plan.prices[0].id,
                  onSignin: () => router.refresh(),
                  onSubscribe: () => router.refresh(),
                })
              }
            >
              Subscribe
            </button>
          </div>
        ))}
      </div>
    </div>
  );
};
The createSubscription method takes care of both user sign-in and subscription checkouts:
- For users that are already signed in, the function will directly take them to the subscription plan checkout.
- If the user is not signed in or doesn't have an account yet, they will be prompted to sign-in, after which they will proceed to the checkout.
The function's options allow us to add independent callbacks for both of these event - onSignin and onSubscribe. In the case of our demo app, both callbacks will simply refresh the app state using Next's router.refresh().
Accessing User and Subscription Data
Now that we've given our users the option to sign in and create subscriptions, let's make it so that our app displays some basic info about their auth status.
With Reflow, this is very easy - we just need to call the user and subscription server functions.
import getAuth from "@/auth";
import PricingTable from "./components/PricingTable";

export default async function Home() {

  const auth = getAuth();
  const user = await auth.user();
  const subscription = await auth.subscription();

  async function getPlans() { ... }

  const plans = (await getPlans()).data;

  return (
    <main className="flex min-h-screen flex-col items-center justify-start p-6 lg:p-24">
      <div className="relative flex w-full max-w-3xl flex-col items-center border bg-white px-4 py-16 text-left">
        <div className="flex flex-col gap-y-12">

          <section className="flex flex-col items-center gap-y-4">
            <h3 className="text-xl font-semibold">Subscription Plans</h3>
            <p className="max-w-lg text-center text-gray-700">
              Select one of the plans and start a subscription.
            </p>

            <PricingTable plans={plans} />
          </section>

        </div>
      </div>
    </main>
  );
}
These methods will return a User and a Subscription object, if such is available. When the user is not logged in or doesn't have a subscription, the respective function will return null.
We can use these objects to display some basic info about the current user.
import getAuth from "@/auth";
import PricingTable from "./components/PricingTable";

export default async function Home() {

  const auth = getAuth();
  const user = await auth.user();
  const subscription = await auth.subscription();

  async function getPlans() { ... }

  const plans = (await getPlans()).data;

  return (
    <main className="flex min-h-screen flex-col items-center justify-start p-6 lg:p-24">
      <div className="relative flex w-full max-w-3xl flex-col items-center border bg-white px-4 py-16 text-left">
        <div className="flex flex-col gap-y-12">

          <section className="flex flex-col items-center gap-y-4 text-center">
            <h3 className="text-xl font-semibold">Auth & Subscription Status</h3>
            <p className="max-w-md text-center text-gray-700">
              Here we display information about the user based on their
              authentication and subscription status.
            </p>

            <p>
              <b>Auth status:</b>{" "}
              {user ? (<>
                  Signed in as {user.name}.
                </>
              ) : (
                <>You are not signed in.</>
              )}
            </p>

            <p>
              <b>Subscription status:</b>{" "}
              {subscription ? (
                <>
                  Subscribed to {subscription.plan.name}.
                </>
              ) : (
                <>You are not subscribed.</>
              )}
            </p>

          </section>

          {!subscription && (
            <>
              <hr></hr>
              <section className="flex flex-col items-center gap-y-4">
                <h3 className="text-xl font-semibold">Subscription Plans</h3>
                <p className="max-w-lg text-center text-gray-700">
                  Select one of the plans and start a subscription.
                </p>

                <PricingTable plans={plans} />
              </section>
            </>
          )}

        </div>
      </div>
    </main>
  );
}
Adding a Logout Button
Our app also needs to give signed-in users a way to sign out. This is very easy to accomplish with the signOut client function.
We add a LogoutButton client component and display it only when the user is signed in.
"use client";

import { signOut } from "@reflowhq/auth-next/client";
import { useRouter } from "next/navigation";

export default function () {
  const router = useRouter();

  return (
    <button
      onClick={() => signOut({ onSuccess: () => router.refresh() })}
      className="ml-2 rounded border border-red-500 px-2 py-1 text-sm text-red-500 hover:text-red-600"
    >
      Sign Out
    </button>
  );
}
import getAuth from "@/auth";
import PricingTable from "./components/PricingTable";
import LogoutButton from "./components/LogoutButton";

export default async function Home() {

  const auth = getAuth();
  const user = await auth.user();
  const subscription = await auth.subscription();

  async function getPlans() { ... }

  const plans = (await getPlans()).data;

  return (
    <main className="flex min-h-screen flex-col items-center justify-start p-6 lg:p-24">
      <div className="relative flex w-full max-w-3xl flex-col items-center border bg-white px-4 py-16 text-left">
        <div className="flex flex-col gap-y-12">

          <section className="flex flex-col items-center gap-y-4 text-center">
            <h3 className="text-xl font-semibold">Auth & Subscription Status</h3>
            <p className="max-w-md text-center text-gray-700">
              Here we display information about the user based on their
              authentication and subscription status.
            </p>

            <p>
              <b>Auth status:</b>{" "}
              {user ? (<>
                  Signed in as {user.name}.
                  <LogoutButton />
                </>
              ) : (
                <>You are not signed in.</>
              )}
            </p>

            <p>
              <b>Subscription status:</b>{" "}
              {subscription ? (
                <>
                  Subscribed to {subscription.plan.name}.
                </>
              ) : (
                <>You are not subscribed.</>
              )}
            </p>
          </section>

          {!subscription && (
            <>
              <hr></hr>
              <section className="flex flex-col items-center gap-y-4">
                <h3 className="text-xl font-semibold">Subscription Plans</h3>
                <p className="max-w-lg text-center text-gray-700">
                  Select one of the plans and start a subscription.
                </p>

                <PricingTable plans={plans} />
              </section>
            </>
          )}

        </div>
      </div>
    </main>
  );
}
When the button is clicked, the session will end and all of the Reflow browser cookies will be cleared.
Adding a Cancel Subscription Button
Similarly to signing out, we also need to give our users a way to cancel their subscription. This can be accomplished using the modifysubscription client function.
"use client";

import { modifySubscription } from "@reflowhq/auth-next/client";
import { useRouter } from "next/navigation";

export default function () {
  const router = useRouter();

  return (
    <button
      onClick={() => modifySubscription({ onSuccess: () => router.refresh() })}
      className="ml-2 rounded border border-red-500 px-2 py-1 text-sm text-red-500 hover:text-red-600"
    >
      Unsubscribe
    </button>
  );
}
import getAuth from "@/auth";
import PricingTable from "./components/PricingTable";
import LogoutButton from "./components/LogoutButton";
import UnsubscribeButton from "./components/UnsubscribeButton";

export default async function Home() {

  const auth = getAuth();
  const user = await auth.user();
  const subscription = await auth.subscription();

  async function getPlans() { ... }

  const plans = (await getPlans()).data;

  return (
    <main className="flex min-h-screen flex-col items-center justify-start p-6 lg:p-24">
      <div className="relative flex w-full max-w-3xl flex-col items-center border bg-white px-4 py-16 text-left">
        <div className="flex flex-col gap-y-12">

          <section className="flex flex-col items-center gap-y-4 text-center">
            <h3 className="text-xl font-semibold">Auth & Subscription Status</h3>
            <p className="max-w-md text-center text-gray-700">
              Here we display information about the user based on their
              authentication and subscription status.
            </p>

            <p>
              <b>Auth status:</b>{" "}
              {user ? (<>
                  Signed in as {user.name}.
                  <LogoutButton />
                </>
              ) : (
                <>You are not signed in.</>
              )}
            </p>

            <p>
              <b>Subscription status:</b>{" "}
              {subscription ? (
                <>
                  Subscribed to {subscription.plan.name}.
                  <UnsubscribeButton />
                </>
              ) : (
                <>You are not subscribed.</>
              )}
            </p>
          </section>

          {!subscription && (
            <>
              <hr></hr>
              <section className="flex flex-col items-center gap-y-4">
                <h3 className="text-xl font-semibold">Subscription Plans</h3>
                <p className="max-w-lg text-center text-gray-700">
                  Select one of the plans and start a subscription.
                </p>

                <PricingTable plans={plans} />
              </section>
            </>
          )}

        </div>
      </div>
    </main>
  );
}
When the UnsubscribeButton component is clicked, the user will be presented with a popup dialog with a number of options for controlling their subscription. This includes switching to another plan, changing the saved payment method or cancelling the subscription.
All of these actions are handled entirely by Reflow, there is no need to add any code, apart from calling the modifySubscription method.
Guarded and Subscriber-only Content
Of course having subscriptions in an app means nothing if we don't provide features that are available only to subscribed users. What you wish to reserve as subscriber-only content will depend on the nature of product.
For the sake of this tutorial, let's create a simple GuardButton component. It will accept a condition bool parameter and depending on its value will display either a blue success button or a red error button.
"use client";

import { ReactNode } from "react";

const GuardButton = ({
  condition,
  children,
}: {
  condition: boolean;
  children: ReactNode;
}) => {
  return (
    <>
      {condition ? (
        <button
          onClick={() => alert("Success!")}
          className="focus:shadow-outline h-14 w-32 rounded-lg bg-blue-500 p-2 text-sm font-bold text-white focus:outline-none"
        >
          {children}
        </button>
      ) : (
        <button className="focus:shadow-outline h-14 w-32 rounded-lg bg-red-500 p-2 text-sm font-bold text-white focus:outline-none active:animate-errorShake">
          {children}
        </button>
      )}
    </>
  );
};

export default GuardButton;
Here we use the guard button to check for the user's auth and subscription status:
import getAuth from "@/auth";
import PricingTable from "./components/PricingTable";
import LogoutButton from "./components/LogoutButton";
import UnsubscribeButton from "./components/UnsubscribeButton";
import GuardButton from "./components/GuardButton";

export default async function Home() {

  const auth = getAuth();
  const user = await auth.user();
  const subscription = await auth.subscription();

  async function getPlans() { ... }

  const plans = (await getPlans()).data;

  return (
    <main className="flex min-h-screen flex-col items-center justify-start p-6 lg:p-24">
      <div className="relative flex w-full max-w-3xl flex-col items-center border bg-white px-4 py-16 text-left">
        <div className="flex flex-col gap-y-12">

          <section className="flex flex-col items-center gap-y-4 text-center">
            <h3 className="text-xl font-semibold">Auth & Subscription Status</h3>
            <p className="max-w-md text-center text-gray-700">
              Here we display information about the user based on their
              authentication and subscription status.
            </p>

            <p>
              <b>Auth status:</b>{" "}
              {user ? (<>
                  Signed in as {user.name}.
                  <LogoutButton />
                </>
              ) : (
                <>You are not signed in.</>
              )}
            </p>

            <p>
              <b>Subscription status:</b>{" "}
              {subscription ? (
                <>
                  Subscribed to {subscription.plan.name}.
                  <UnsubscribeButton />
                </>
              ) : (
                <>You are not subscribed.</>
              )}
            </p>
          </section>

          {!subscription && (
            <>
              <hr></hr>
              <section className="flex flex-col items-center gap-y-4">
                <h3 className="text-xl font-semibold">Subscription Plans</h3>
                <p className="max-w-lg text-center text-gray-700">
                  Select one of the plans and start a subscription.
                </p>

                <PricingTable plans={plans} />
              </section>
            </>
          )}

          <hr></hr>

          <section className="flex flex-col items-center gap-y-4">
            <h3 className="text-xl font-semibold">Guarded Actions</h3>
            <p className="max-w-md text-center text-gray-700">
              Depending on the user's auth and subscription status, only some of
              the buttons will be available.
            </p>

            <div className="flex max-w-lg flex-wrap justify-center gap-4">
              <GuardButton condition={true}>Free Access</GuardButton>
              <GuardButton condition={!!user}>Auth Access</GuardButton>
              <GuardButton condition={!!subscription}>Subscriber Access</GuardButton>
            </div>
          </section>

        </div>
      </div>
    </main>
  );
}
Limiting Content to Specific Subscription Plans
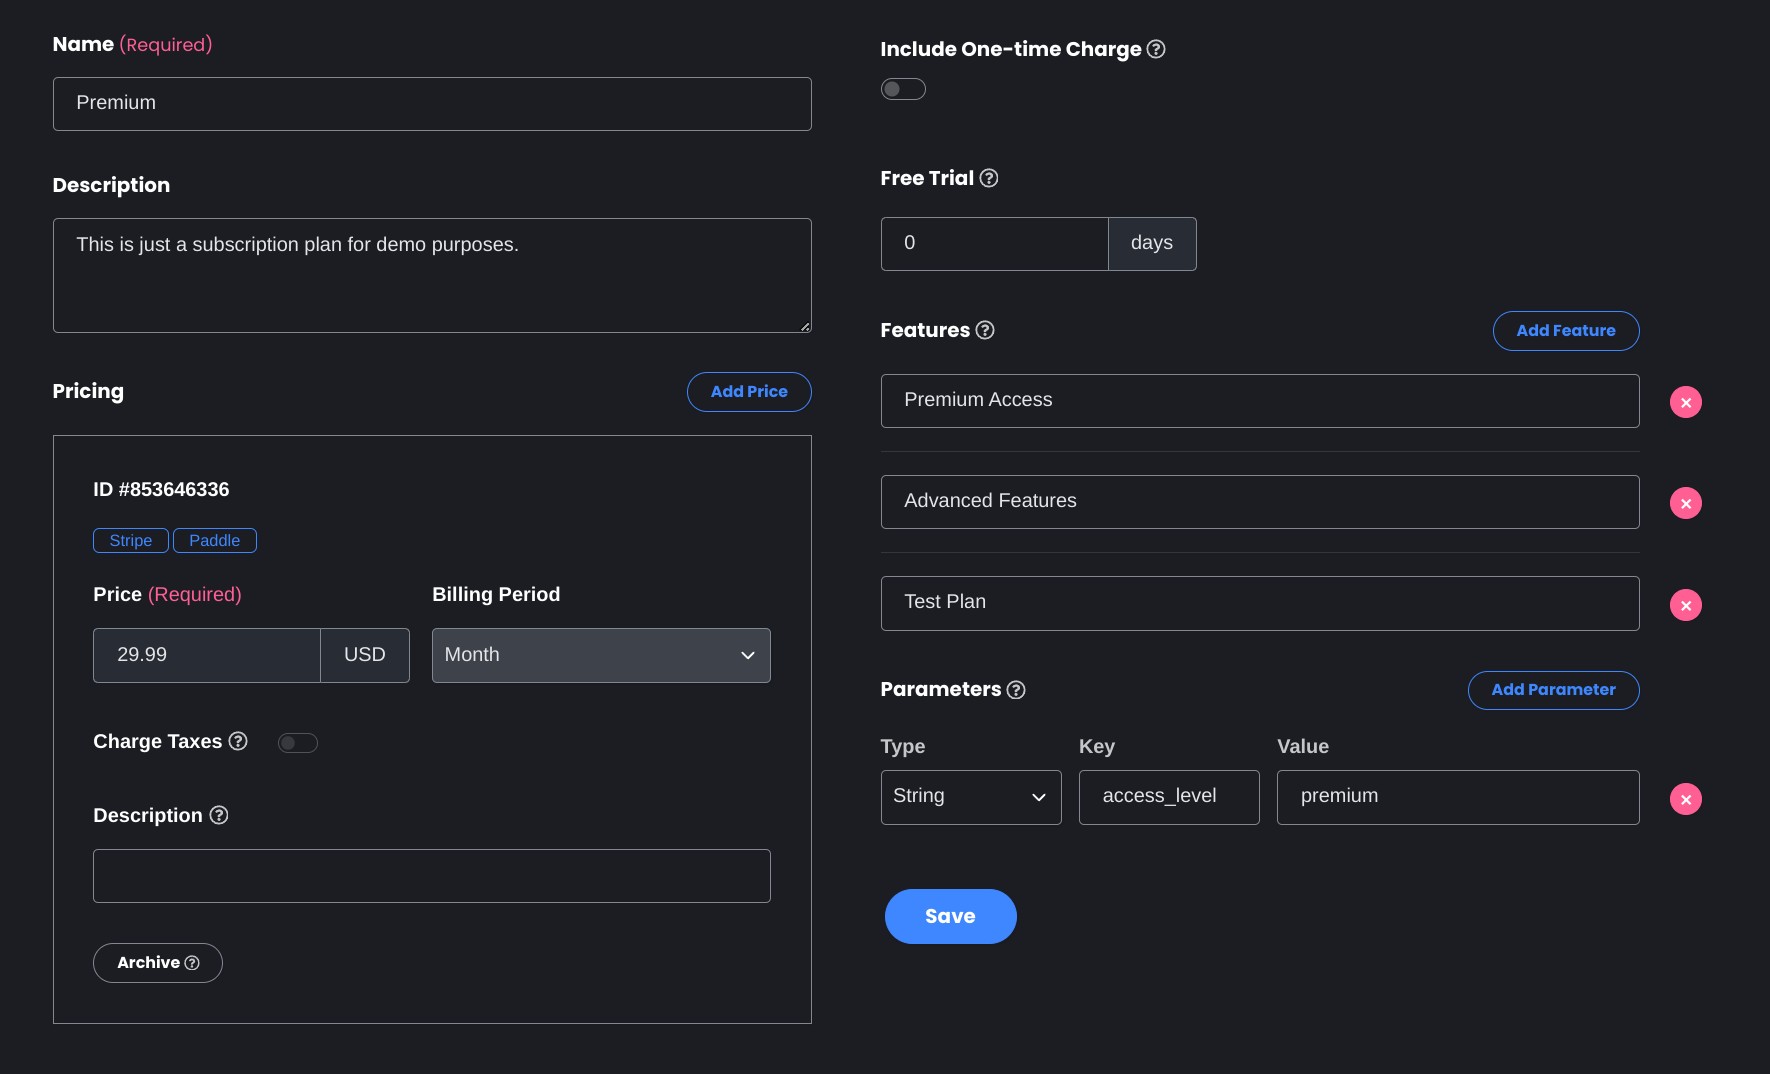
If we wish to reserve some functionality to only specific plans, we can do this using Reflow's plan parameters feature. These can be configured from the plan settings:
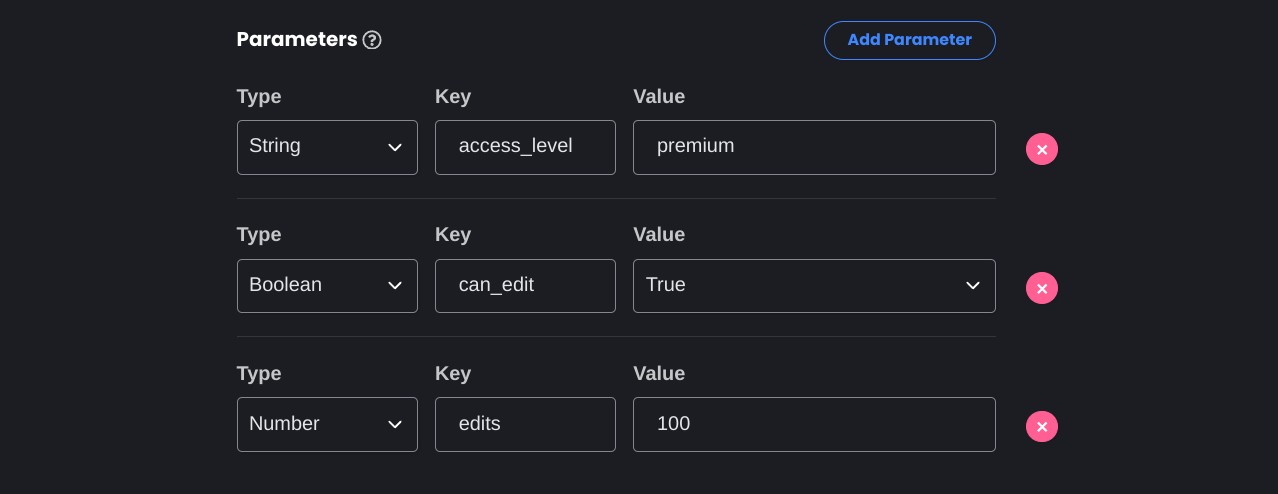
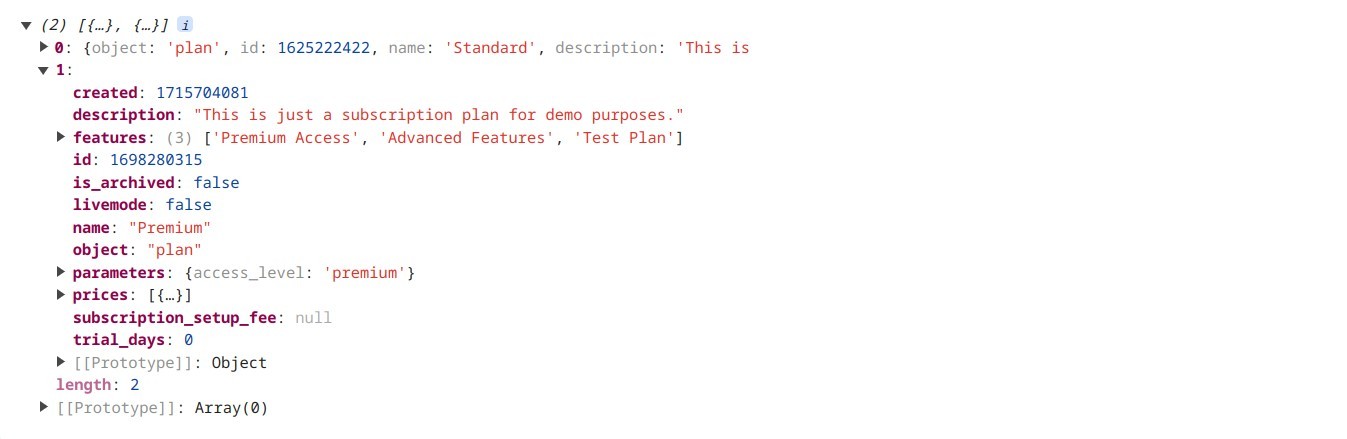
The parameters are included automatically with the subscription object. They can have boolean, string or numeric values, which allows for a lot of different applications.
In our demo app we'll use the access_level parameter, allowing certain buttons to be clicked only by users with the appropriate access level.
import getAuth from "@/auth";
import PricingTable from "./components/PricingTable";
import LogoutButton from "./components/LogoutButton";
import UnsubscribeButton from "./components/UnsubscribeButton";
import GuardButton from "./components/GuardButton";

export default async function Home() {

  const auth = getAuth();
  const user = await auth.user();
  const subscription = await auth.subscription();

  async function getPlans() { ... }

  const plans = (await getPlans()).data;

  return (
    <main className="flex min-h-screen flex-col items-center justify-start p-6 lg:p-24">
      <div className="relative flex w-full max-w-3xl flex-col items-center border bg-white px-4 py-16 text-left">
        <div className="flex flex-col gap-y-12">

          <section className="flex flex-col items-center gap-y-4 text-center">
            <h3 className="text-xl font-semibold">Auth & Subscription Status</h3>
            <p className="max-w-md text-center text-gray-700">
              Here we display information about the user based on their
              authentication and subscription status.
            </p>

            <p>
              <b>Auth status:</b>{" "}
              {user ? (<>
                  Signed in as {user.name}.
                  <LogoutButton />
                </>
              ) : (
                <>You are not signed in.</>
              )}
            </p>

            <p>
              <b>Subscription status:</b>{" "}
              {subscription ? (
                <>
                  Subscribed to {subscription.plan.name}.
                  <UnsubscribeButton />
                </>
              ) : (
                <>You are not subscribed.</>
              )}
            </p>
          </section>

          {!subscription && (
            <>
              <hr></hr>
              <section className="flex flex-col items-center gap-y-4">
                <h3 className="text-xl font-semibold">Subscription Plans</h3>
                <p className="max-w-lg text-center text-gray-700">
                  Select one of the plans and start a subscription.
                </p>

                <PricingTable plans={plans} />
              </section>
            </>
          )}

          <hr></hr>

          <section className="flex flex-col items-center gap-y-4">
            <h3 className="text-xl font-semibold">Guarded Actions</h3>
            <p className="max-w-md text-center text-gray-700">
              Depending on the user's auth and subscription status, only some of
              the buttons will be available.
            </p>

            <div className="flex max-w-lg flex-wrap justify-center gap-4">
              <GuardButton condition={true}>Free Access</GuardButton>
              <GuardButton condition={!!user}>Auth Access</GuardButton>
              <GuardButton condition={!!subscription}>Subscriber Access</GuardButton>

              <GuardButton
                condition={
                  subscription?.plan.parameters.access_level == "standard"
                }
              >
                Standard Plan Access
              </GuardButton>

              <GuardButton
                condition={
                  subscription?.plan.parameters.access_level == "premium"
                }
              >
                Premium Plan Access
              </GuardButton>
            </div>
          </section>

        </div>
      </div>
    </main>
  );
}
For a more complex parameters use case example, you can check out our Building an Image Editor with DALL-E and Next.js article. In it we use a numeric parameter to track the maximum amount of times a certain action can be performed.
Deploying to Vercel
With this our subscriptions app is complete!
If you wish to deploy what we've built in this guide to a production app, the easiest way to go about it is using Vercel's GitHub import feature.
All you need to do is push your code to a GitHub repo and connect your Vercel account. Add the environment variables we setup locally to the Vercel project using their handy UI in Settings > Environment Variables.
That's it! The app is a standard Next.js project and follows all the best practices so the deployment should work with all the default settings.
Conclusion
By following this tutorial, you've integrated Reflow Auth into your Next.js application to handle user authentication and subscription management. Reflow simplifies these complex processes, allowing you to focus on building great features for your users. Happy coding!
For more detailed documentation, visit the Reflow Docs. If you have any questions or encounter any issues, feel free to leave a message on our GitHub repo for this article.