A complete step-by-step guide on implementing user auth and account profiles in your Next.js project.

Since the introduction of the new app router and server components in Next.js 13, many developers find themselves overwhelmed with the task of adding user auth to their projects. In this tutorial, we will show you a super easy method for integrating user accounts into any Next.js app.
Follow along to learn how to add sign-in/sign-out functionality, display information about the logged in user, add controls for managing user accounts, and more!
What We Are Building
For this tutorial we will be building a simple app that lets users create an account. Thanks to Reflow, our users will be able to sign in to their accounts using email+password or by using a social account of theirs, for example Google or Apple.
Once signed in, our users will be able to see some information about their account, as well as the option to change their username and profile image.
Get The Code
You can find the full code for this tutorial in our GitHub. If you would like to take it for a test drive, we also have a live demo app that you can try.
Running The Demo Locally
To run the demo locally, you can clone the GitHub repo and run the following commands. You will need to have Node.js 18 or higher installed, since older version won't work with Next.js (how to install Node.js).
git clone https://github.com/Reflow-HQ/nextjs-how-to-add-users-demo
cd nextjs-how-to-add-users-demo/
npm install
Environment Variables
After Next.js and all the dependencies are installed, you will need to configure the app with some environment variables. Create a file with the name .env.local and add these two lines.
REFLOW_PROJECT_ID=
SESSION_SECRET=
For the REFLOW_PROJECT_ID fill in the ID of your Reflow project, which can be found in the dashboard settings page. This ID will connect the app we are building with your Reflow account.
The SESSION_SECRET can be any 32 character-long string. It will be used for encrypting the user session token, making sure that only your code can read the cookie data. You can run openssl rand -hex 16 in the terminal to generate a secret key.
You should never commit your
.env.localfiles to git or make them public in other ways. Doing so can expose your secret codes and other sensitive data.
Start The Dev Server
Our environment variables are now configured. We can start the Next.js dev server to run our app.
npm run dev
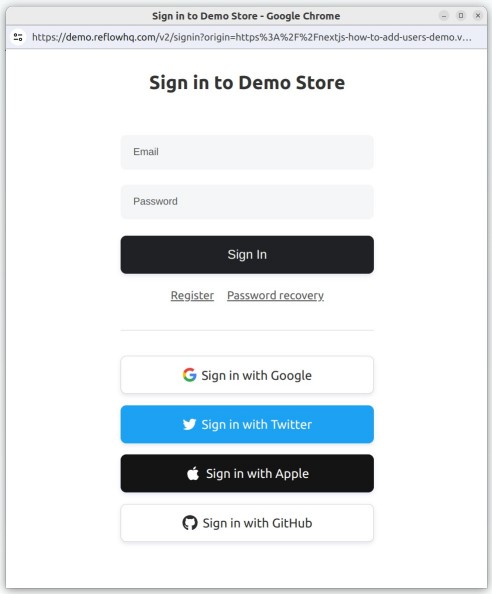
The demo app should be available at http://localhost:3000/ in the browser. If everything is setup correctly, we will see a simple page with a Sign In button. Clicking the Sign In button will open a popup window for logging into your account.
The available sign in providers will depend on your Reflow project's settings. You can enable any number of providers, including simple email+password accounts, as well as socials such as Google, Facebook, Apple and more.
For the auth library sign in to work, you will need to add the domain of your project (typically
http://localhost:3000in Next.js) in the Reflow Sign In settings.
Now that we've got the demo app running, let's see how we can build it from scratch!
Create Next App
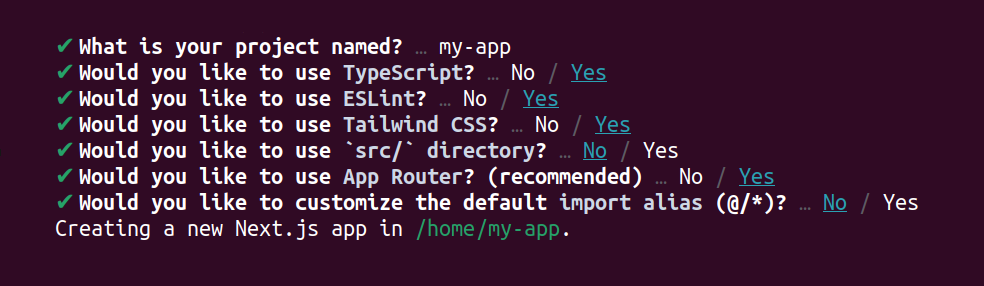
To start things off, lets create a new directory and run create-next-app to generate a starting template to work with.
npx create-next-app
We will be using TypeScript, ESLint and Tailwind CSS. For app structure, we will go with the App Router option. Of course, all of these come to personal preference, but for the sake of following along with the article, we recommend going with these options.
Running npm run dev in the newly created directory should open a standard Next.js template page.
The page has some default content, but we won't be needing any of that. Let's open /app/page.tsx and clear everything. This will serve as a clean slate for us to work on.
export default function Home() {
  return <p>Hello World!</p>;
}
Installing Reflow Auth
The Reflow Auth library will allow us to add users to our app and manage their accounts. It will take care of the entire user sign in process for us but first we need to configure it.
The install process is covered in detailed in the docs, so let's quickly go over it.
npm install @reflowhq/auth-next
We need to create a file called auth.ts in the root directory of our projects.
import "server-only";
import { ReflowAuth } from "@reflowhq/auth-next";

export default function getAuth(): ReflowAuth {
  const { SESSION_SECRET, REFLOW_PROJECT_ID } = process.env;
  const config = {
    projectID: Number(REFLOW_PROJECT_ID),
    secret: String(SESSION_SECRET),
  };
  return new ReflowAuth(config);
}
It will setup the library by reading environment variables from a .env.local file. The same env file we discussed earlier in this article will work.
The next file we need to create is a route handler. It acts as the "glue" between the Reflow client functions and the server.
import getAuth from "../../auth";

export async function POST(request: Request) {
  const auth = getAuth();
  return await auth.handleRequest(request);
}
With these two files created in their respective directories, the auth library is now ready to be imported and used in our code.
Adding Sign In Button
Let's add a simple Sign In component to our app that will allow users to create an account and log in.
For this, we will need a client component that imports the reflow auth library and displays a button. When the button is clicked, auth signIn will be called and the library will handle the sign in process from there.
"use client";

import { signIn } from "@reflowhq/auth-next/client";

export default function LoginButton() {
  return (
    <button
      onClick={() => signIn({ onSuccess: () => location.reload() })}
      className="focus:shadow-outline w-24 rounded bg-blue-500 px-4 py-2 text-sm font-bold text-white hover:bg-blue-600 focus:outline-none"
    >
      Sign In
    </button>
  );
}
This is all that's required for signing in our users. We just need to add the component to our page.tsx file, along with some code that checks if the user is currently authenticated or a guest.
import getAuth from "@/auth";
import LoginButton from "./components/LoginButton";

export default async function Home() {
  const auth = getAuth();
  const user = await auth.user();

  return (
    <div className="flex w-full max-w-xl flex-col items-center border bg-white p-10 text-left">
      {user ? (
        "Authenticated"
      ) : (
        <>
          <p className="mb-4">Sign in to get started</p>
          <LoginButton />
        </>
      )}
    </div>
  );
}
When we click the login button, a popup window will open prompting the user to register or sign in if they already have an account.
Displaying User Account Details
After our user has signed in, Reflow auth will give us access to their account data via the auth.user() method. This includes their email, username, profile photo and more.
Let's add some elements to our page that will display the user's name and profile image. We just need to check if auth.user is available (meaning the user is signed in) and access the relevant properties from the user object.
import getAuth from "@/auth";
import LoginButton from "./components/LoginButton";

export default async function Home() {
  const auth = getAuth();

  const user = await auth.user();

  return (
    <div className="flex w-full max-w-xl flex-col items-center border bg-white p-10 text-left">
      {user ? (
        <>
          <h2 className="mb-8 font-bold">Hello, {user.name || user.email}!</h2>
          <Image
            src={user.photo}
            alt="User Profile"
            width={96}
            height={96}
            className="mb-10 h-24 w-24 rounded-full object-cover"
          />
        </>
      ) : (
        <>
          <p className="mb-4">Sign in to get started</p>
          <LoginButton />
        </>
      )}
    </div>
  );
}
Now our app should look something like this when we are signed in:

You can read more about the user object and all the data it contains in the docs. There is also a TypeScript definition included in the library, which can be imported from import type { User } from "@reflowhq/auth-next/types";.
Next.js Images Config
There is an additional step we need to do here, in order to make Next.js properly load our user's profile images. Since the images are coming from the Reflow API, we need to instruct Next.js to trust the external domains using remotePatterns.
/** @type {import('next').NextConfig} */
const nextConfig = {
  images: {
    remotePatterns: [
      {
        protocol: "https",
        hostname: "cdn.reflowhq.com",
        port: "",
        pathname: "/media/**",
      },
      {
        protocol: "https",
        hostname: "api.reflowhq.com",
        port: "",
        pathname: "/img/**",
      },
    ],
  },
};

export default nextConfig;
Adding Sign Out Button
Of course our users should also have the option to sign out of their account. For this, we will need another simple button component.
"use client";

import { signOut } from "@reflowhq/auth-next/client";

export default function LogoutButton() {
  return (
    <button
      onClick={() => signOut({ onSuccess: () => location.reload() })}
      className="focus:shadow-outline w-24 rounded bg-blue-500 px-4 py-2 text-sm font-bold text-white hover:bg-blue-600 focus:outline-none"
    >
      Sign Out
    </button>
  );
}
As you can see, this code is almost identical to the Sign In button, the only difference being it calls the auth signOut method instead. When clicked, the user session will be cleared and the page will reload, in order to refresh all cookies.
We can add the new component to the page.
import getAuth from "@/auth";
import LoginButton from "./components/LoginButton";
import LogoutButton from "./components/LogoutButton";

export default async function Home() {
  const auth = getAuth();
  const user = await auth.user();

  return (
    <div className="flex w-full max-w-xl flex-col items-center border bg-white p-10 text-left">
      {user ? (
        <>
          <h2 className="mb-8 font-bold">Hello, {user.name || user.email}!</h2>
          <Image
            src={user.photo}
            alt="User Profile"
            width={96}
            height={96}
            className="mb-10 h-24 w-24 rounded-full object-cover"
          />
          <LogoutButton />
        </>
      ) : (
        <>
          <p className="mb-4">Sign in to get started</p>
          <LoginButton />
        </>
      )}
    </div>
  );
}
Updating The Account Username
Now that our users can sign in and out, let's give them the option to change some aspects of their account, such as their username.
Configuring the Server Action
First, let's take care of the backend.
We will need to add a server action for updating the user profiles. For this, create a new file in the root directory called lib.ts. This will be a use server component, marking it as a server action.
"use server";

import getAuth from "@/auth";
import { UpdateUserOptions } from "@reflowhq/auth-next/types";

export async function updateUser(
  prevState: any,
  formData: FormData = new FormData()
) {
  try {
    const auth = getAuth();

    const update: UpdateUserOptions = {};

    if (formData.get("username"))
      update.name = formData.get("username") as string;

    const result = await auth.updateUser(update);

    if (!result.success) {
      throw new Error();
    }

    await auth.refresh();

    return {
      success: true,
      message: "User Updated!",
      timestamp: new Date().getTime(),
    };
  } catch (error: unknown) {
    return {
      success: false,
      message: "User Update Failed",
      timestamp: new Date().getTime(),
    };
  }
}
The server action expects a FormData object, containing the new name. It is then sent to the Reflow API via the auth.updateUser function. You can read more about updateUser and it's available properties in the library docs.
The auth.updateUser will send a request to the Reflow API, validating the input data and updating the user. However, the function does not update the cached auth.user object - that's why it's necessary to call auth.refresh() after a successful update.
Adding a Client Form Component
To send FormData to the backend, we will need a client component containing an HTML form. To keep our code clean, we will add this to a new component.
This component will be pretty simple - it needs to have a HTML form with a text input, as well as a submit button. Submitting the form will be handled entirely by the React useFormState hook, calling the server action we defined above.
"use client";

import { useFormState } from "react-dom";
import { updateUser } from "@/lib";
import { FormSubmitButton } from "./FormSubmitButton";

export default function UpdateNameForm({ name }: { name?: string }) {
  const [formState, formAction] = useFormState<{
    success?: boolean;
    message?: string;
    timestamp?: number;
  }>(updateUser, {});

  return (
    <form action={formAction}>
      <label className="mb-1 block font-bold" htmlFor="username">
        Username
      </label>
      <div className="mb-10 flex w-80 items-center justify-center sm:w-96">
        <input
          className="mr-2 w-full appearance-none rounded border px-3 py-2 leading-tight text-gray-700 read-only:bg-gray-100 focus:outline-none"
          id="username"
          type="text"
          name="username"
          defaultValue={name}
          required
        ></input>

        <FormSubmitButton />
      </div>
    </form>
  );
}
app/components/UpdateUser/FormSubmitButton.tsx
export function FormSubmitButton() {
  return (
    <button
      type="submit"
      className="focus:shadow-outline w-24 rounded border border-blue-500 px-4 py-2 text-sm font-bold text-blue-500 hover:border-blue-600 hover:text-blue-600 focus:outline-none"
    >
      Save
    </button>
  );
}
Lastly, we need to add our new component to /app/page.tsx.
import getAuth from "@/auth";
import LoginButton from "./components/LoginButton";
import LogoutButton from "./components/LogoutButton";
import UpdateNameForm from "./components/UpdateUser/UpdateNameForm";

export default async function Home() {
  const auth = getAuth();
  const user = await auth.user();

  return (
    <div className="flex w-full max-w-xl flex-col items-center border bg-white p-10 text-left">
      {user ? (
        <>
          <h2 className="mb-8 font-bold">Hello, {user.name || user.email}!</h2>
          <Image
            src={user.photo}
            alt="User Profile"
            width={96}
            height={96}
            className="mb-10 h-24 w-24 rounded-full object-cover"
          />
          <UpdateNameForm name={user.name} />
          <LogoutButton />
        </>
      ) : (
        <>
          <p className="mb-4">Sign in to get started</p>
          <LoginButton />
        </>
      )}
    </div>
  );
}
The result should look something like this:

When the Save button is clicked, the form will be submitted, causing the updateUser server action to activate. If the data is valid, the user's name will update, causing our app to rerender and display the new name.
Showing a Loading Indicator
Our code so far works but there are some things we can do to improve the usability of our form. Let's add an animated spinning indicator that will be displayed while the form request is processing.
Thanks to the useFormStatus hook, this is really easy to do - we check the pending property and display our animated SVG when it is truthful.
import clsx from "clsx";
import { useFormStatus } from "react-dom";

export function LoadingIndicator() {
  const { pending } = useFormStatus();

  return (
    <div role="status">
      <svg
        className={clsx(
          pending ? "" : "hidden",
          "ml-4 h-8 w-8 animate-spin fill-blue-600 "
        )}
        viewBox="0 0 100 101"
        xmlns="http://www.w3.org/2000/svg"
      >
        <path
          d="M93.9676 39.0409C96.393 38.4038 97.8624 35.9116 97.0079 33.5539C95.2932 28.8227 92.871 24.3692 89.8167 20.348C85.8452 15.1192 80.8826 10.7238 75.2124 7.41289C69.5422 4.10194 63.2754 1.94025 56.7698 1.05124C51.7666 0.367541 46.6976 0.446843 41.7345 1.27873C39.2613 1.69328 37.813 4.19778 38.4501 6.62326C39.0873 9.04874 41.5694 10.4717 44.0505 10.1071C47.8511 9.54855 51.7191 9.52689 55.5402 10.0491C60.8642 10.7766 65.9928 12.5457 70.6331 15.2552C75.2735 17.9648 79.3347 21.5619 82.5849 25.841C84.9175 28.9121 86.7997 32.2913 88.1811 35.8758C89.083 38.2158 91.5421 39.6781 93.9676 39.0409Z"
          fill="currentFill"
        />
      </svg>
    </div>
  );
}
This component doesn't require any props, so we just need to import it and add it to our form.
"use client";

import { useFormState } from "react-dom";
import { updateUser } from "@/lib";
import { FormSubmitButton } from "./FormSubmitButton";
import { LoadingIndicator } from "./LoadingIndicator";

export default function UpdateNameForm({ name }: { name?: string }) {
  const [formState, formAction] = useFormState<{
    success?: boolean;
    message?: string;
    timestamp?: number;
  }>(updateUser, {});

  return (
    <form action={formAction}>
      <label className="mb-1 block font-bold" htmlFor="username">
        Username
      </label>
      <div className="mb-10 flex w-80 items-center justify-center sm:w-96">
        <input
          className="mr-2 w-full appearance-none rounded border px-3 py-2 leading-tight text-gray-700 read-only:bg-gray-100 focus:outline-none"
          id="username"
          type="text"
          name="username"
          defaultValue={name}
          required
        ></input>
        <FormSubmitButton />
        <LoadingIndicator />
      </div>
    </form>
  );
}
Displaying Success and Error Messages
Another UI improvement we can make is to display a message when the form request has been completed. This is actually pretty vital to any form because it shows our users when update has been successful, or even more importantly, shows an error message when there has been a problem.
For this, we will need a another client component that shows a toast and then auto hides it after three seconds.
import clsx from "clsx";
import { useEffect, useState } from "react";

export function FormResultMessage({
  message,
  resultSuccess,
  timestamp,
}: {
  message?: string;
  resultSuccess?: boolean;
  timestamp?: number;
}) {
  const [toastMessage, setToastMessage] = useState<string | undefined>(message);

  useEffect(() => {
    if (message) {
      setToastMessage(message);
      setTimeout(() => {
        setToastMessage(undefined);
      }, 3000);
    }
  }, [message, timestamp]);

  return (
    <div
      className={clsx(
        "pointer-events-none absolute left-1/2 top-4 w-64 -translate-x-1/2 transform rounded border bg-white p-1 text-center text-sm transition duration-500",
        toastMessage ? "opacity-100" : "opacity-0",
        resultSuccess
          ? "border-blue-500 text-blue-500"
          : "border-red-700 text-red-700"
      )}
    >
      {message}
    </div>
  );
}
This component has a few props that we will need to pass from the parent component:
message- The message of our toast notification. This is passed directly from the result of our server action.resultSuccess- A boolean indicating whether we should show a success (blue) or error (red) toast.timestamp- A timestamp of the event that will refresh the component when the form is resubmitted.
Here is how we use it in the UserNameForm parent component:
"use client";

import { useFormState } from "react-dom";
import { updateUser } from "@/lib";
import { FormSubmitButton } from "./FormSubmitButton";
import { LoadingIndicator } from "./LoadingIndicator";
import { FormResultMessage } from "./FormResultMessage";

export default function UpdateNameForm({ name }: { name?: string }) {
  const [formState, formAction] = useFormState<{
    success?: boolean;
    message?: string;
    timestamp?: number;
  }>(updateUser, {});

  return (
    <form action={formAction}>
      <label className="mb-1 block font-bold" htmlFor="username">
        Username
      </label>
      <div className="mb-10 flex w-80 items-center justify-center sm:w-96">
        <input
          className="mr-2 w-full appearance-none rounded border px-3 py-2 leading-tight text-gray-700 read-only:bg-gray-100 focus:outline-none"
          id="username"
          type="text"
          name="username"
          defaultValue={name}
          required
        ></input>
        <FormSubmitButton />
        <LoadingIndicator />
        <FormResultMessage
          message={formState.message}
          resultSuccess={formState.success}
          timestamp={formState.timestamp}
        />
      </div>
    </form>
  );
}
With this our interface for updating the user name is done!
Updating The Profile Image
To add a component for updating the user's profile image, we can reuse a lot of the code we already have with tiny modifications.
First, we will need to add this line to our server action so that it knows how to update the user photo.
"use server";

import getAuth from "@/auth";
import { UpdateUserOptions } from "@reflowhq/auth-next/types";

export async function updateUser(
  prevState: any,
  formData: FormData = new FormData()
) {
  try {
    const auth = getAuth();

    const update: UpdateUserOptions = {};

    if (formData.get("username"))
      update.name = formData.get("username") as string;

    if (formData.get("photo")) update.photo = formData.get("photo") as Blob;

    const result = await `auth.updateUser`(update);

    if (!result.success) {
      throw new Error();
    }

    await auth.refresh();
    return {
      success: true,
      message: "User Updated!",
      timestamp: new Date().getTime(),
    };
  } catch (error: unknown) {
    return {
      success: false,
      message: "User Update Failed",
      timestamp: new Date().getTime(),
    };
  }
}
Our client component will look almost exactly like the one for updating the username.
The main difference being that instead of a text input we want a input type='file' for selecting a photo from the local device. We will also add a useEffect hook here that will clear the file input on successful update.
"use client";

import { useFormState } from "react-dom";
import { updateUser } from "@/lib";
import { useEffect, useRef, useState } from "react";
import { FormSubmitButton } from "./FormSubmitButton";
import { FormResultMessage } from "./FormResultMessage";
import { LoadingIndicator } from "./LoadingIndicator";

export default function UpdatePhotoForm({ photo }: { photo?: string }) {
  const [formState, formAction] = useFormState<{
    success?: boolean;
    message?: string;
    timestamp?: number;
  }>(updateUser, {});

  const fileInputElement = useRef<HTMLInputElement>(null);

  useEffect(() => {
    if (formState.success) {
      if (fileInputElement.current) {
        fileInputElement.current.value = "";
      }
    }
  }, [formState]);

  return (
    <form action={formAction}>
      <label className="mb-1 block font-bold" htmlFor="photo">
        Profile Image
      </label>
      <div className="mb-10 mt-2 flex w-80 items-center justify-center sm:w-96">
        <input
          id="photo"
          name="photo"
          ref={fileInputElement}
          type="file"
          accept=".png, .jpg, .jpeg"
          required
          className="border-secondary-500 relative me-2 block w-full cursor-pointer rounded border border-solid px-3 py-2 leading-tight text-gray-700 file:-mx-3 file:-my-[0.32rem] file:me-3 file:cursor-pointer file:overflow-hidden  file:rounded-none file:border-0 file:border-e file:border-solid file:border-inherit file:bg-transparent file:px-3 focus:outline-none"
        ></input>

        <FormSubmitButton />

        <LoadingIndicator />

        <FormResultMessage
          message={formState.message}
          resultSuccess={formState.success}
          timestamp={formState.timestamp}
        />
      </div>
    </form>
  );
}
This is all the code we need for updating the profile photo. All that's left is to add it to our page.
import getAuth from "@/auth";
import LoginButton from "./components/LoginButton";
import LogoutButton from "./components/LogoutButton";
import UpdateNameForm from "./components/UpdateUser/UpdateNameForm";
import UpdatePhotoForm from "./components/UpdateUser/UpdatePhotoForm";

export default async function Home() {
  const auth = getAuth();
  const user = await auth.user();

  return (
    <div className="flex w-full max-w-xl flex-col items-center border bg-white p-10 text-left">
      {user ? (
        <>
          <h2 className="mb-8 font-bold">Hello, {user.name || user.email}!</h2>
          <Image
            src={user.photo}
            alt="User Profile"
            width={96}
            height={96}
            className="mb-10 h-24 w-24 rounded-full object-cover"
          />
          <UpdateNameForm name={user.name} />
          <UpdatePhotoForm photo={user.photo} />
          <LogoutButton />
        </>
      ) : (
        <>
          <p className="mb-4">Sign in to get started</p>
          <LoginButton />
        </>
      )}
    </div>
  );
}
With the UpdatePhotoForm component in place, our app should look like so:
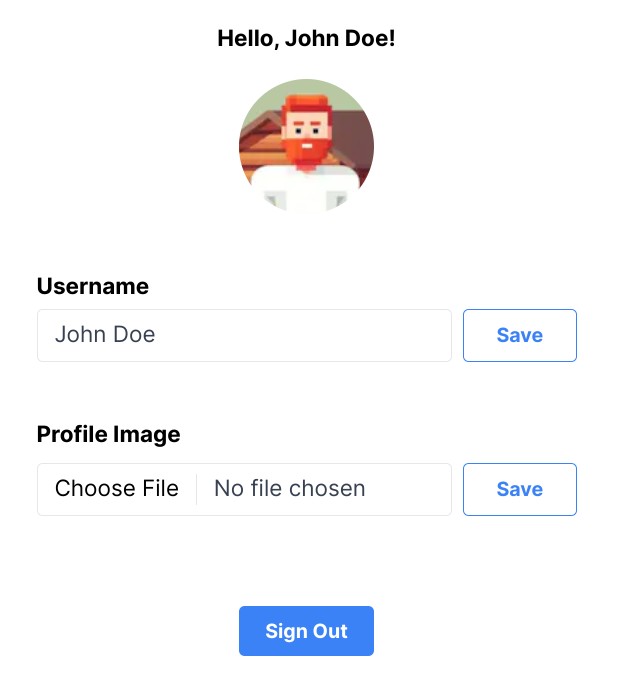
When the profile image form is submitted the new photo will go through our Next.js backend sever action, which will then send it to the Reflow API. After the upload is successful, our app will rerender and the user will be able to see their new profile photo in the <Image/> component.
Deploying to Vercel
The app we built in this tutorial, as well as the GitHub demo are standard Next.js apps and follow all the best practices. This makes deploying them in a Vercel project a breeze.
Add your code to a GitHub repo and go to https://vercel.com/import/git. Here you will need to install Vercel for GitHub and give it the appropriate access.
Add the REFLOW_PROJECT_ID and SESSION_SECRET environment variables as discussed earlier in the article. You can also copy & paste the contents of your .env.local file into Vercel to import them.
Apart from that, no further configuration is needed - all the default build and deployment settings should work out of the box.
Conclusion
In this tutorial, we learned how to implement user authentication in projects using Next.js 13 and above.
We covered some of the powerful features of the Reflow auth library and we implemented components for user sign-in/sign-out, displaying account details, and forms for updating the username and profile image.
Have questions or feedback? Leave a comment in the tutorial's GitHub repo or write us an email. We would love to hear from you what other tutorials you would like to see!