A quick example demonstrating how to password protect a Next.js app. No database or user accounts required.

One simple way to hide your work in progress but still give access to your collaborators, is to implement basic password protection that requires a passkey to reveal your app. We'll go over the key parts of the code and try to shed some light on how user sessions work in Next.js.
We'll be using Next.js v14 and the Reflow Auth library for handling session cookies, which will greatly simplify the code of our server components.
Running The Demo
The code for the demo app can be found on GitHub and is deployed on a vercel app which you can find here.
To run the demo locally, clone the github repo and follow the steps below. You will need to have Node.js 18+ installed on your machine (how to install Node.js).
git clone https://github.com/Reflow-HQ/nextjs-password-protect-demo.git
cd nextjs-password-protect-demo/
npm install
This will install Next.js and all required dependencies.
Once that's done, you will need to make a copy of the .env.example file and name it .env. This file will contain all the environment variables required for running the demo, as well as some default values for them. We will go over how you can customize them later in the environment variables section.
After making sure the .env file exists, you can start the Next.js dev server.
npm run dev
Opening http://localhost:3000/ in the browser should open the demo app.
On your first visit, the app will be in guest mode and there won't be any cookies set.
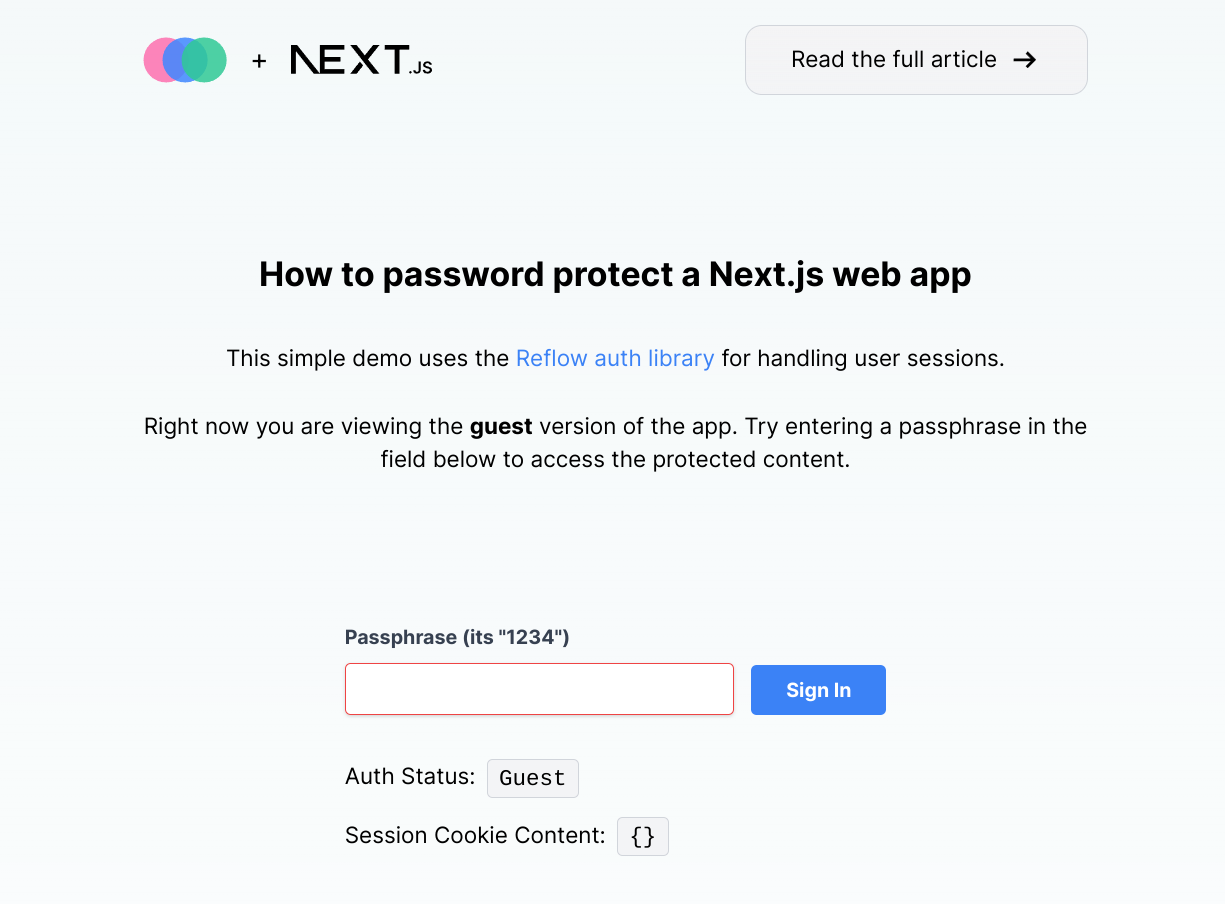
You can try entering a passphrase to set the cookies and see the app in the authenticated mode. The default password we've added is 1234. We'll look at how you can change this next.
Environment Variables
The demo makes use of environment variables to simplify the app setup and make it easier to configure different environments like dev and production. You can edit them in the .env file we created earlier.
You should never commit your .env files to git or make them public in other ways. Doing so can expose your secret codes and other sensitive data.
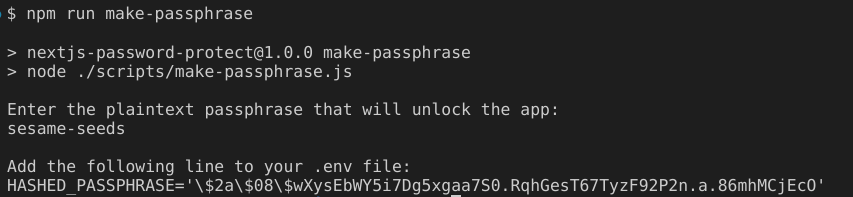
HASHED_PASSPHRASE
This environment variable determines the hashed version of the plaintext passphrase that users need to enter to access the authenticated app state.
By default the plaintext passphrase is 1234 and the hashed value is $2a$08$xoocEB/08LvDA0.ihpcZRuy.hHvIlsN5bbTxA25ezO8E8DycOMONm. The hash is used in the code to check if entered passphrases match the correct password or not. It is a one-way hash, meaning that the encrypted hash cannot be reversed to get the original password string value.
You can generate a new passphrase by running npm run make-passphrase and entering the text you wish to use as a password.
SESSION_SECRET
The session secret is a 32 character-long string that will be used for encrypting the user session token. This is necessary to make sure only your code is able to decrypt the information stored in the session cookie.
You can enter any random 32 char string, or use the npm run make-session-secret command to generate one.

REFLOW_PROJECT_ID
The last environment variable is your Reflow project id, which is necessary for using the Reflow Auth library.
You can obtain your project ID from the Reflow dashboard settings page.
Reflow Auth Library Setup
After all the environment variables are set, we can use them to initialize the Reflow Auth library. This is done in the auth.ts file, located in the root directory.
import "server-only";
import { ReflowAuth } from "@reflowhq/auth-next";

export default function getAuth(): ReflowAuth {
  const { SESSION_SECRET, REFLOW_PROJECT_ID } = process.env;
  const config = {
    projectID: Number(REFLOW_PROJECT_ID),
    secret: String(SESSION_SECRET),
  };
  return new ReflowAuth(config);
}
This code gets the necessary values from .env and passes them to a new ReflowAuth instance. We can now use the returned ReflowAuth object and its methods to manage server cookies.
Guest and Authenticated States
Our app is made up only one page, located at app/page.tsx. In it we check the session cookie and show one of two client components, depending on the cookie contents.
import { getSession } from "@/lib";
import { Guest } from "./ui/guest";
import { Authenticated } from "./ui/authenticated";

export default async function Home() {
  const session = await getSession();

  return (
    // ...
    {session.hasAccess ? <Authenticated /> : <Guest />}
    // ...
  );
}
Both of the UI client components are simple HTML forms that make calls to the server component on submit.
The guest component has a password input for entering the passphrase. On submit it calls signIn, which is a server component method we will look at in the next section.
"use client";
import { useFormState } from "react-dom";
import { signIn } from "@/lib";
export function Guest() {
const [state, formAction] = useFormState<{
success?: boolean;
error?: string;
}>(signIn, {});
return (
<div className="text-center">
<form action={formAction}>
<div className="mt-6 flex items-end">
<div>
<label
className="mb-2 block text-left text-sm font-bold text-gray-700"
htmlFor="passphrase"
>
Passphrase (its "1234")
</label>
<input
className="focus:shadow-outline w-full appearance-none rounded border border-red-500 px-3 py-2 leading-tight text-gray-700 shadow focus:outline-none"
id="passphrase"
name="passphrase"
type="password"
placeholder=""
autoComplete="off"
/>
</div>
<button
className="focus:shadow-outline ml-3 w-24 rounded bg-blue-500 px-4 py-2 text-sm font-bold text-white hover:bg-blue-600 focus:outline-none"
type="submit"
>
Sign In
</button>
</div>
{state.error && (
<p className="mt-2 text-sm italic text-red-500">{state.error}</p>
)}
</form>
</div>
);
}
The authenticated component is where we show our protected content, that only users who know the passphrase should see. It also includes a form, which when submitted calls signOut and returns the user back to the guest state.
"use client";

import { useFormState } from "react-dom";
import { signOut } from "@/lib";

export function Authenticated() {
  const [state, formAction] = useFormState<{
    success?: boolean;
    error?: string;
  }>(signOut, {});

  return (
    <div className="text-center">
      <form action={formAction}>
        <div className="mb-20 mt-6">
          <div className="w-100 rounded border border-gray-400 px-8 py-5">
            The content here is accessible only by authenticated users.
          </div>
          <button
            className="focus:shadow-outline mt-4 rounded bg-blue-500 px-4 py-2 text-sm font-bold text-white hover:bg-blue-600 focus:outline-none"
            type="submit"
          >
            Sign Out
          </button>
        </div>

        {state.error && (
          <p className="mt-2 text-sm italic text-red-500">{state.error}</p>
        )}
      </form>
    </div>
  );
}
Session Server Actions
The last part of our app are the server actions, located in lib.ts. This is a server component file, that imports the Reflow Auth library we setup earlier. It then uses the library in a couple of methods that handle all of our user sessions.
Lets first look at getSession. It is a straightforward function that just returns the content of the session cookie. This is the method we use in app/page.tsx to check whether the Guest or Authenticated client components should be displayed.
export async function getSession() {
  const auth = getAuth();
  return await auth.all();
}
The signIn method is what we use in app/ui/guest.tsx as a form action when a passphrase is entered. It first checks if the plaintext passphrase from the input matches the hash in our .env file.
If the password is correct, the function uses Reflow Auth to add hasAccess: true in the session cookie. If the cookie did not exist before this, auth.set will automatically create a new cookie and encrypt it.
This cookie will then be saved in the browser and persisted - reloading the page or visiting it at a later time will remember that the user is already authenticated.
export async function signIn(
  prevState: any,
  formData: FormData = new FormData()
) {
  const { HASHED_PASSPHRASE } = process.env;
  const inputPhrase = formData.get("passphrase");

  if (!compareSync(inputPhrase as string, HASHED_PASSPHRASE as string)) {
    return {
      error: "Incorrect Passphrase",
    };
  }

  const auth = getAuth();
  await auth.set("hasAccess", true);
  return { success: true };
}
The last method in lib.ts is signOut, which is used as a form action in the app/ui/authenticated.tsx client component. When the form is submitted, this method simply clears out the session cookie. This results in the user being logged out and losing access to the protected content.
export async function signOut(
  prevState: any,
  formData: FormData = new FormData()
) {
  const auth = getAuth();
  await auth.clear();
  return { success: true };
}
Although this is a basic example, hopefully you can see how easy the Reflow Auth library makes it to work with session cookies.
Deploying to Vercel
If you would like to deploy this app to Vercel, the easiest way to do it is by importing from GitHub.
Upload your code to a GitHub repo, then go to https://vercel.com/import/git, install Vercel for GitHub and give it access to your repo.
All of the default deployment and build settings Vercel recommends should work. The only thing you'll need to configure is the environment variables we discussed earlier.
Simply paste the contents of your .env file into the Vercel environment variables UI and they should import automatically.
Remove all escaping backslashes \ from env variables when importing them to Vercel.
This is necessary because in local .env files some special characters (e.g. $) need to be escaped. In Vercel escape characters are not needed and the backslashes will be parsed as part of the env variable.
You can then deploy your app and Vercel will install all dependencies and run the build scripts for you.
Conclusion
Tackling user sessions in Next.js can seem intimidating with all the changes introduced in the new app router in Next 13. We hope that with this guide we showed you a simple way to bootstrap your Next.js apps for working with cookies in your server components.
If you run into any issues or have questions about this guide, please add them in the GitHub repo or write to us directly.